
Welcome to the Rubbermaid 7×7 Storage Shed instructions! This guide will help you efficiently assemble and maintain your durable, weather-resistant shed for optimal storage solutions;
Overview of the Rubbermaid 7×7 Storage Shed
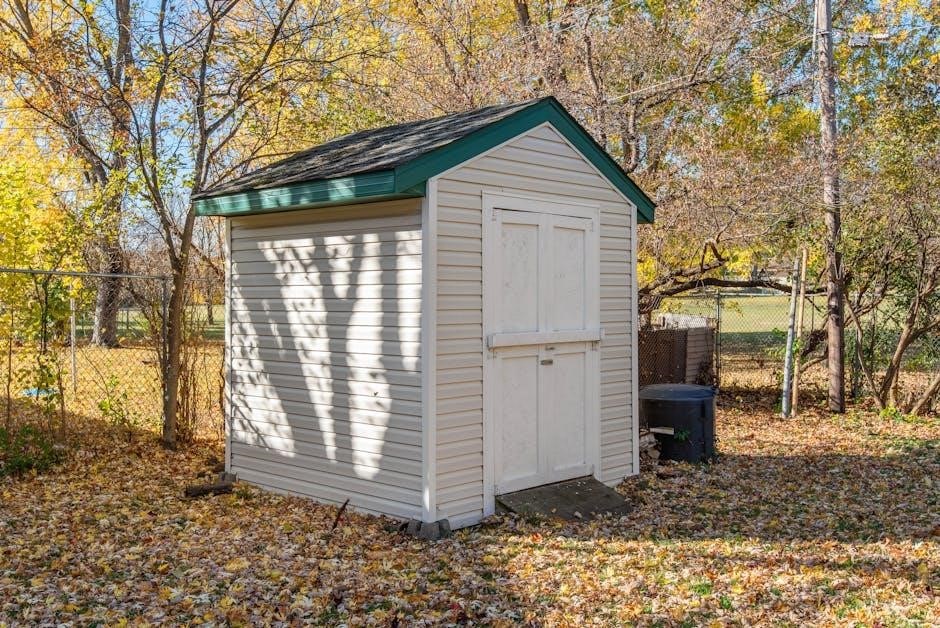
The Rubbermaid 7×7 Storage Shed is a durable, weather-resistant outdoor storage solution designed to keep your yard organized. Measuring 7 feet by 7 feet, it offers ample space for storing garden tools, equipment, and other outdoor items. Constructed from high-quality resin, this shed is built to withstand harsh weather conditions, ensuring long-lasting performance. Its sleek design complements any backyard while providing functional storage. The shed is easy to assemble with the provided instructions and requires minimal maintenance. It’s an ideal choice for homeowners seeking a reliable and stylish storage option. With its sturdy construction and versatile design, the Rubbermaid 7×7 Storage Shed is perfect for keeping your outdoor space tidy and clutter-free.
Importance of Following Assembly Instructions
Following the assembly instructions for the Rubbermaid 7×7 Storage Shed is crucial for ensuring a safe, efficient, and successful installation. Proper assembly guarantees the shed’s structural integrity, preventing potential issues like misalignment or instability. Deviating from the instructions can lead to safety hazards, such as collapsing walls or an unstable roof. Additionally, failing to follow guidelines may void the product warranty. By adhering to the instructions, you’ll avoid common mistakes and ensure the shed withstands harsh weather conditions; Taking the time to carefully follow each step will result in a durable, long-lasting storage solution that meets your needs and enhances your outdoor space.
Tools and Materials Required
To assemble the Rubbermaid 7×7 Storage Shed, gather essential tools and materials beforehand. Required tools include a screwdriver, wrench, rubber mallet, and safety glasses for protection. Ensure you have a level to ensure the base is even. Additionally, check for any hardware like screws, nuts, and bolts provided in the kit. Verify the presence of all parts by cross-referencing the inventory list. Having a second person assist can make the assembly process easier and safer. Proper tools and materials ensure a smooth, efficient, and safe assembly experience. Always refer to the manual for specific requirements to avoid delays or complications during the process;
Pre-Assembly Preparation
Begin by unpacking and organizing all parts, ensuring no components are missing. Prepare a level, solid surface for assembly, following the manufacturer’s guidelines for site readiness.
Unpacking and Inventory of Parts
Start by carefully unpacking all components from the boxes. Cross-reference each item with the provided parts list to ensure nothing is missing or damaged. Organize the parts neatly, grouping similar items together for easy access. Pay special attention to small hardware like screws, bolts, and brackets, as these are crucial for assembly. If any parts are missing or damaged, contact Rubbermaid customer support immediately. Familiarize yourself with the instruction manual, which includes diagrams and labels to help identify each component. Proper organization and verification of parts will streamline the assembly process and prevent delays. Double-check everything before proceeding to ensure a smooth experience.
Preparing the Site for Assembly
Select a flat, stable area for your shed, ensuring it is level and firm. Clear the site of debris, vegetation, and obstructions to create a clean workspace. The area should be at least 14 feet by 14 feet to accommodate the shed and provide ample space for assembly. Check local building codes and regulations to ensure compliance. Ensure the surface is even and well-drained to prevent water accumulation. If necessary, level the ground using sand or gravel for stability. Avoid low-lying areas prone to water pooling. Position the shed in a way that allows proper drainage and easy access. Once the site is prepared, you can proceed with assembling your Rubbermaid 7×7 storage shed confidently.
Ensuring a Level Surface
A level surface is crucial for the stability and proper assembly of your Rubbermaid 7×7 storage shed. Begin by assessing the ground using a carpenter’s level or a spirit level. Identify any uneven areas and address them by adding sand or gravel to low spots or removing material from high areas. Repeat the leveling process until the surface is perfectly even. If the ground is significantly uneven, consider constructing a base using wooden planks or a concrete slab for added stability. Ensure the surface is firm and compact to prevent shifting during assembly. A level foundation ensures the shed’s doors align correctly and the structure remains secure, preventing potential damage from uneven weight distribution. Proper leveling guarantees a safe and durable storage solution for years to come.

Step-by-Step Assembly Instructions
Follow the detailed guide to assemble your Rubbermaid 7×7 shed, starting with the floor, then walls, roof, and doors. Ensure all parts are securely fastened for stability.
Assembling the Floor and Base
Begin by unpacking and organizing all floor and base components. Ensure the site is level and clear of debris. Lay the floor panel on the ground, aligning it with the base frame. Use a rubber mallet to gently tap pieces into place, securing them with provided fasteners. Follow the manual’s diagram to attach side rails and support beams. Tighten all bolts firmly but avoid overtightening. Double-check that the base is square and level before proceeding. If any parts feel unstable, re-examine the connections. Once the floor and base are securely assembled, you can move on to constructing the walls. Always refer to the instruction manual for specific torque requirements and alignment guides.
Constructing the Walls
Start by attaching the wall panels to the base using the provided connectors. Align each panel with the floor’s edge, ensuring a snug fit. Begin with the back and front walls, securing them with screws. Next, attach the side panels, matching their pre-drilled holes with the base. Use a rubber mallet to gently tap panels into place. Double-check alignment and tighten all fasteners firmly. If a panel feels loose, adjust its position before proceeding. Once walls are upright, ensure they are evenly spaced and the structure is square. Avoid overtightening to prevent damage. Finally, verify that all wall sections are securely locked into the base before moving on to the roof assembly. Proper wall alignment is crucial for the shed’s stability and weather resistance.
Attaching the Roof
Begin by preparing the roof panels and ridge beam. Align the first roof panel with the top edge of the front wall, ensuring it fits securely into the provided channels. Use screws to fasten the panel to the wall and base. Repeat this process for the second roof panel on the back side. Once both panels are in place, attach the ridge beam along the peak of the roof to secure the panels together. Tighten all screws firmly to ensure a snug fit. Finally, check for any gaps or misalignments and seal them to prevent water leaks. Proper roof alignment ensures the shed’s stability and weather resistance. Always follow the manufacturer’s instructions for precise fitting. Make sure the roof is evenly spaced and securely attached before moving on to the next step. This step is critical for the shed’s structural integrity and durability.
Installing Doors and Hardware
Start by aligning the door frames with the pre-cut openings on the shed walls. Secure the hinges to the door frames using the provided screws. Attach the doors to the hinges, ensuring proper alignment with the wall edges. Next, install the door handles and latches by screwing them into place. Make sure the doors open and close smoothly by checking the alignment and tightening the hinges if necessary. Finally, test the latches to ensure they secure the doors properly. Use a screwdriver for all hardware installations. Properly installed doors and hardware ensure easy access and secure storage. Follow the manufacturer’s instructions for precise fitting and alignment. This step completes the shed’s functional components, readying it for use. Ensure all hardware is tightly secured for durability.

Safety Guidelines and Precautions
Ensure safety by wearing protective gear and following guidelines to prevent accidents during assembly and use of your Rubbermaid 7×7 storage shed. Wear safety glasses, keep children away, and avoid standing on the roof.
General Safety Tips
Always prioritize safety when assembling and using your Rubbermaid 7×7 storage shed. Wear safety glasses and gloves to protect yourself from debris. Ensure the assembly area is clear of obstacles and tripping hazards. Avoid standing or sitting on the roof, as it is not designed to support weight. Keep children away from the shed during assembly and use. Use proper lifting techniques to handle heavy parts, and never assemble alone. Be cautious in extreme weather conditions, such as high winds or intense heat. Regularly inspect the shed for damage and address issues promptly. Follow all manufacturer guidelines to ensure safe and durable use of your storage shed. Refer to the manual for detailed safety precautions.
Handling Heavy Parts and Tools
When handling heavy parts and tools during the assembly of your Rubbermaid 7×7 storage shed, prioritize caution to avoid injuries. Always use proper lifting techniques, bending at the knees and keeping the load close to your body. Ensure the workspace is clear of clutter to prevent tripping. Wear safety glasses and gloves to protect yourself from sharp edges or accidental tool slips. Avoid overreaching or stretching excessively, as this can lead to strain or accidents. If a part is too heavy, consider enlisting a second person to assist. Store tools in a designated area to maintain organization and safety. Never leave tools unattended or within reach of children. By following these guidelines, you can ensure a safer assembly process.
Securing the Shed Against Harsh Weather
To safeguard your Rubbermaid 7×7 storage shed from harsh weather, ensure proper anchoring using a recommended anchoring kit to prevent shifting in strong winds. Regularly inspect the roof and walls for any gaps or damage, sealing them promptly with weatherproof sealants. Keep the shed’s surroundings clear of debris and ensure proper drainage to avoid water accumulation. For added protection, apply a UV-resistant coating to the exterior surfaces. During extreme weather conditions, secure doors tightly and consider reinforcing the structure if necessary. Routine inspections and maintenance will help maintain the shed’s integrity and extend its lifespan, ensuring it remains a reliable storage solution for years to come.
Post-Assembly Tips
After assembling your Rubbermaid 7×7 storage shed, perform a final inspection to ensure all parts are securely tightened. Organize the interior with shelves or hooks for efficient storage. Regularly clean and maintain the shed to preserve its appearance and functionality over time.
Final Inspection and Tightening
After completing the assembly, conduct a thorough inspection of your Rubbermaid 7×7 storage shed. Check all bolts, screws, and connections to ensure they are tightly secured. Verify that the roof is properly aligned and attached to the walls. Ensure the doors open and close smoothly, adjusting hinges if necessary. Inspect the floor for stability and make sure all panels are securely locked in place. Address any gaps or misalignments promptly to prevent structural issues. Refer to the manual for specific tightening sequences and torque recommendations. Finally, double-check that all safety features, such as door latches, are functioning correctly before using the shed.
Organizing the Shed
Once your Rubbermaid 7×7 storage shed is assembled, organizing the space effectively is key to maximizing its utility. Start by categorizing items based on usage and size, placing frequently used tools and equipment near the front for easy access. Install shelves or hooks to store smaller items like gardening tools, seeds, or accessories. Use storage bins or containers to keep seasonal decorations or less frequently used items neatly arranged. Label each bin or shelf for quick identification. Heavy items, such as lawn mowers or fertilizers, should be placed near the floor for stability. Keep the shed tidy by regularly cleaning and ensuring all items are securely stored. This will help maintain a clutter-free and functional space.
Maintenance and Upkeep
Regular maintenance is essential to ensure your Rubbermaid 7×7 storage shed remains durable and functional. Start by cleaning the exterior and interior periodically to remove dirt and debris. Inspect the doors and hinges for proper alignment and lubricate them if necessary to ensure smooth operation. Check for any signs of wear or damage, such as cracks or dents, and address them promptly to prevent further issues. Secure the shed doors tightly after each use to protect contents from pests or weather. Additionally, trim nearby vegetation to avoid moisture buildup and ensure proper ventilation. Regular upkeep will extend the lifespan of your shed and keep it looking its best.
Additional Resources
For further assistance, access online manuals and video tutorials on the Rubbermaid website. Visit their YouTube channel for assembly guides or contact customer support at 1-888-895-2110.
Accessing Online Manuals
To access the Rubbermaid 7×7 storage shed instructions, visit the official Rubbermaid website. Manuals are available at the bottom of each product page. Click the provided links to download PDF files or view them directly online. Additionally, video tutorials on the Rubbermaid YouTube channel offer step-by-step assembly guidance. For further assistance, contact customer support at 1-888-895-2110 or visit www.rubbermaid.com. Ensure to review the manual thoroughly before starting assembly for a smooth and successful process. Proper preparation and adherence to instructions ensure your shed is built safely and efficiently. Always verify the product code or model number to download the correct manual for your specific storage shed.
Video Tutorials and Guides
Rubbermaid provides comprehensive video tutorials to assist with assembling your 7×7 storage shed. These videos are available on the official Rubbermaid YouTube channel and offer a visual step-by-step guide. They cover key assembly processes, including floor installation, wall construction, and roof attachment. Additionally, the videos demonstrate how to install doors and hardware correctly. Watching these tutorials can help you understand complex steps and ensure a proper assembly. Visit the Rubbermaid YouTube page and search for the specific 7×7 shed model to access these resources. These videos are designed to complement the written instructions, making the assembly process easier and more manageable for all users.
Customer Support Contact Information
For assistance with your Rubbermaid 7×7 storage shed, contact their customer support team at 1-888-895-2110, available Monday through Friday from 8:30 a.m. to 5:00 p.m. EST. Visit their official website at www.rubbermaid.com for additional resources, including manuals and troubleshooting guides. If you encounter any issues, such as missing or damaged parts, reach out to their support team for prompt resolution. Rubbermaid’s customer service is dedicated to ensuring a smooth assembly and ownership experience for your storage shed.

Tips for Customization
Customize your Rubbermaid 7×7 shed by adding shelves for storage, painting it to match your home, and organizing interior spaces for maximum efficiency and personal style.
Adding Shelves and Storage Solutions
Maximize your Rubbermaid 7×7 shed’s functionality by adding shelves and storage solutions. Install adjustable shelves to organize tools, seasonal items, or gardening supplies. Use hooks or pegboards for hanging bikes, tools, or accessories. Consider adding cabinets or bins for storing smaller items like seeds, screws, or chemicals. Measure your space carefully to ensure shelves fit securely and evenly. Anchor shelves to the walls to prevent tipping. Customize the layout to suit your needs, such as dedicating one area for heavy-duty items and another for lighter storage. This will create a clutter-free, efficient space tailored to your lifestyle.
Painting and Decorating the Shed
Personalize your Rubbermaid 7×7 shed by painting and decorating it to match your outdoor aesthetic. Ensure the surface is clean and dry before applying high-quality exterior acrylic paint. Lightly sand rough areas for better paint adhesion. Choose weather-resistant colors to withstand outdoor conditions; Consider adding decorative trim or shutters for a charming look. Install exterior lighting or flower boxes to enhance its curb appeal. For a cohesive design, match the shed’s color to your home or garden theme. Always follow manufacturer guidelines for painting plastic surfaces. This customization will make your shed both functional and visually appealing, blending seamlessly into your yard’s landscape.
Troubleshooting Common Issues
Identify and resolve common assembly issues like missing parts or misalignment. Refer to the manual or contact customer support for assistance with damaged or unclear instructions.
Identifying Missing or Damaged Parts
Before starting assembly, thoroughly inspect all components for damage or discrepancies. Cross-reference the parts list to ensure no items are missing. If parts are damaged or absent, contact Rubbermaid customer service immediately. Use the provided contact information, such as the toll-free number (1-888-895-2110), to resolve issues promptly. Keep the original packaging and documentation handy for reference. Organize parts by category to streamline the assembly process. Double-check for clarity, as missing or damaged components can delay construction. Visit the official website for additional support or downloadable manuals if needed.
Resolving Alignment Problems
If alignment issues arise during assembly, ensure the shed is built on a level surface. Check the foundation and adjust as needed using shims or leveling tools. Verify that all wall panels are properly aligned with the base and securely fastened. If roof sections are misaligned, re-examine the wall connections and ensure they are square. Consult the instruction manual or online resources for guidance. Tighten all fasteners firmly but avoid over-tightening, which may cause warping. If persistent alignment problems occur, consider reaching out to Rubbermaid customer support for assistance. Proper alignment is crucial for structural integrity and weather resistance. Addressing these issues early ensures a sturdy and functional shed.
Warranty and Manufacturer Support
Rubbermaid offers a warranty for the 7×7 storage shed, ensuring coverage against defects. For support, contact their customer service at 1-888-895-2110 or visit www.rubbermaid.com.
Understanding the Warranty Terms
The Rubbermaid 7×7 storage shed is backed by a limited warranty that covers manufacturing defects for a specified period. The warranty ensures that defective parts will be repaired or replaced free of charge. It is essential to review the warranty document, which outlines the terms, conditions, and exclusions. Damage caused by improper assembly, misuse, or harsh weather conditions may not be covered. To maintain warranty validity, ensure the shed is assembled correctly and maintained as per the manufacturer’s guidelines. For detailed information, visit the Rubbermaid official website or contact their customer support team. Proper documentation and proof of purchase may be required for warranty claims.
Reaching Out to Customer Service
For assistance with your Rubbermaid 7×7 storage shed, contact their customer service team at 1-888-895-2110, available Monday to Friday, 8:30 AM to 5:00 PM EST. Visit their official website at www.rubbermaid.com for more information or to submit a query. Ensure you have your product details ready for efficient support. Additionally, online resources, such as FAQs or live chat options, may be available to address common concerns. For damaged or missing parts, avoid returning to the store and instead contact customer service directly for assistance. Their team is equipped to help with assembly issues, warranty claims, or general product inquiries, ensuring a smooth experience with your storage shed.
Returning or Replacing Parts
If you encounter damaged or missing parts during assembly, contact Rubbermaid’s customer service at 1-888-895-2110 or visit their website at www.rubbermaid.com. Do not return parts to the store. Provide detailed information about the issue, including your product model and order details, to expedite the process. Most parts are covered under warranty, but ensure you review the warranty terms for specific conditions. Replacement parts are typically shipped directly to you, eliminating the need for further inconvenience. For international orders, check local customer service contact details. Promptly addressing part replacements ensures your shed is assembled correctly and maintains its durability.
Congratulations! You’ve successfully assembled your Rubbermaid 7×7 Storage Shed. By following these instructions, you’ve created a durable, weather-resistant space to organize your outdoor essentials. Proper maintenance and regular inspections will ensure your shed remains in great condition. Customize it with shelves or a fresh coat of paint to match your yard’s style. Remember, your shed is covered by a warranty, offering peace of mind. For any issues, reach out to Rubbermaid’s customer support. Enjoy your new storage solution and the clutter-free outdoor space it provides!
 mjjc foam cannon instructions pdf free download
  presto flipside waffle maker instructions
  invisalign instructions
  singer sew mate 5400 instruction manual
  moultrie game camera instructions manual
  oral hygiene instructions dental code
  bra fit guide
  cell organelles worksheet pdf
  tough nursing leadership interview questions pdf
  god of wrath pdf